3. Alternative Methods for Opening Control Panel Icons
Access to many Control Panel icons is scattered
throughout the Windows Home Server interface, meaning that there’s more
than one way to launch an icon. Many of these alternative methods are
faster and more direct than using the Control Panel folder. Here’s a
summary:
Computer Management— Click Start, right-click Computer, and then click Manage.
Date and Time— Click the clock in the taskbar’s notification area, and then click Change Date and Time Settings.
Default Programs— Select Start, Default Programs.
Devices and Printers— Select Start, Devices and Printers.
Folder Options— In Windows Explorer, either select Organize, Folder and Search Options, or press Alt and then select Tools, Folder Options.
Fonts— In Windows Explorer, open the %SystemRoot%\Fonts folder.
Internet Options— In Internet Explorer, select Tools, Internet Options.
Network and Sharing Center— Right-click the notification area’s Network icon, and then click Open Network and Sharing Center.
Notification Area Icons— Right-click an empty section of the taskbar’s notification area, and then click Customize Notification Area.
Personalization— Right-click the desktop, and then click Personalize.
Scheduled Tasks— Select Start, All Programs, Accessories, System Tools, Task Scheduler. Alternatively, in Windows Explorer, open the %SystemRoot%\Tasks folder.
Sound— Right-click the Volume icon in the notification area, and then click Sounds.
System— Click Start, right-click Computer, and then click Properties. You can also press Windows Logo+Pause/Break.
Taskbar and Start Menu— Right-click an empty section of the taskbar or Start button, and then click Properties.
Troubleshooting— Right-click the Action Center icon in the notification area, and then click Troubleshoot a Problem.
Windows Update—
Click Start, All Programs, Windows Update, or right-click the Action
Center icon in the notification area and then click Open Windows Update.
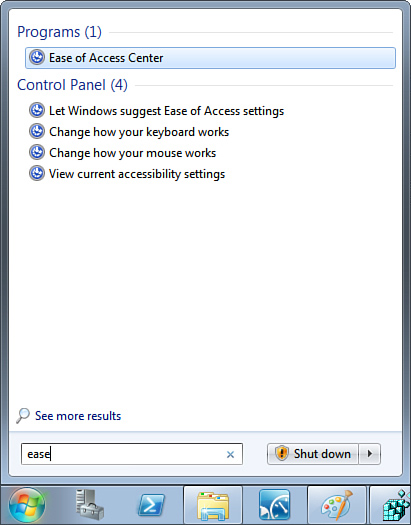
Another relatively easy way to get at a Control Panel
icon is to use the Windows Home Server search engine, which indexes the
Control Panel. Select Start, type some or all of the Control Panel icon
name, and then click the icon that appears in the Control Panel section
of the search results. For example, in Figure 2 I typed ease
in the Search box, and you can see that Ease of Access Center shows up
at the top of the results. Several other related Control Panel items
also appear in the results.
Tip
You can create a special shell folder that displays
every Control Panel command, organized by topic. Create a new folder on
the desktop or some other convenient location, and give the folder the
following name:
Full Control Panel.{ED7BA470-8E54-465E-825C-99712043E01C}
4. Putting a Control Panel Submenu on the Start Menu
You can turn the Start menu’s Control Panel command into a menu that displays the Control Panel icons by following these steps:
1. | Right-click
the Start button, and then click Properties. The Taskbar and Start Menu
Properties dialog box appears with the Start Menu tab displayed.
|
2. | Click Customize. The Customize Start Menu dialog box appears.
|
3. | In the list of Start menu items, find the Control Panel item, and activate the Display as a Menu option.
|
4. | Click OK.
|
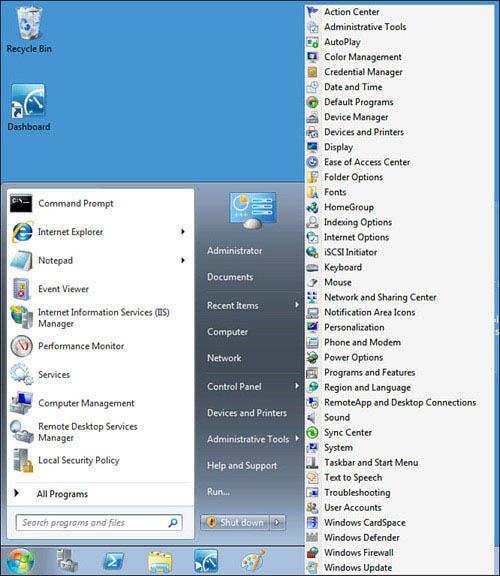
Figure 3 shows the Start menu with the Control Panel item configured as a menu. Depending on the screen resolution
you are using, some of the Control Panel icons might not fit on the
screen. In that case, hover the mouse pointer over the downward-pointing
arrow at the bottom of the menu to scroll through the rest of the
icons. (To scroll up, hover the pointer over the upward-pointing arrow
that appears at the top of the menu.)
5. Removing an Icon from Control Panel
You might find that you don’t use some Control Panel
icons. For example, if your Windows Home Server computer doesn’t have
any iSCSI devices, you’ll never need to use Control Panel’s iSCSI
Initiator icon. Because Control Panel contains so many icons, it makes
sense to remove those you never use. Doing that makes it easier to find
the icon you want and faster to navigate the icons.
Here are the steps for using a group policy to remove icons from Control Panel:
1. | Open the Local Group Policy Editor window.
|
2. | Navigate to the User Configuration, Administrative Templates, Control Panel branch.
|
3. | Double-click the Hide Specified Control Panel applets.
|
4. | Activate the Enabled option.
|
5. | Click Show to display the Show Contents dialog box.
|
6. | Click Add to open the Add Item dialog box.
|
7. | Use the Enter the Item to Be Added text box to specify the Control icon you want to hide. You have two choices:
Type the name of the CPL file that corresponds to the Control Panel icon you want to hide. Type the icon caption as it appears in Control Panel. For example, to hide the iSCSI Initiator icon, type iSCSI Initiator.
Note
You
can only hide icons that appear in the main Control Panel folder. You
can’t hide icons that appear in the Control Panel subfolders, such as
Administrative Tools.
|
8. | Click OK. The Local Group Policy Editor adds the CPL file to the Show Contents dialog box.
|
9. | Repeat steps 6 to 8 to remove other icons.
|
10. | Click OK.
|
6. Showing Only Specified Control Panel Icons
Control Panel is so useful that you’ll probably use
most of the icons at least some of the time. However, it’s possible that
you may only use a few of the icons most of the time. In that case, you
might want to really streamline the Control Panel view by displaying
only those few icons you use. Here’s how to do this using a group
policy:
1. | Open the Local Group Policy Editor window.
|
2. | Navigate to the User Configuration, Administrative Templates, Control Panel branch.
|
3. | Double-click the Show Only Specified Control Panel Applets policy.
|
4. | Activate the Enabled option.
|
5. | Click Show to display the Show Contents dialog box.
|
6. | Click Add to open the Add Item dialog box.
|
7. | Use the Enter the Item to Be Added text box to specify the Control icon you want to show. You have two choices:
Type the name of the CPL file that corresponds to the Control Panel icon you want to show. Type the icon caption as it appears in Control Panel. For example, to show the Programs and Features icon, type Programs and Features.
|
8. | Click OK. The Local Group Policy Editor adds the CPL file to the Show Contents dialog box.
|
9. | Repeat steps 6 to 8 to show other icons.
|
10. | Click OK.
|
Note
Group policies also enable you to customize the
behavior of some Control Panel icons. When you open the User
Configuration, Administrative Templates, Control Panel branch, you’ll
see six subbranches that correspond to six Control Panel icons: Add or
Remove Programs, Display, Personalization, Printers, Programs, and
Regional and Language Options. In each case, you use the policies in a
particular subbranch to hide dialog box tabs, specify default settings,
and more.